What to Expect Before, During, and After a Professional Event Photography Session
A professional event photography session can make or break how your event is remembered. Most event photo “disappointments” happen before anyone picks up a camera. Event photography lives or dies on planning and coordination, access, and a clear definition of what success looks like for your team.
A professional event photographer is there to document key moments, candid moments, and branding photos in a way that matches your goals, your event agenda, and your run-of-show. Here’s how a typical professional event photography session actually works, from the first call to final delivery.
How a Professional Event Photography Session Works (Overview)
A photographer controls composition, exposure, timing, and post-production. You and the venue control access, schedule reality, lighting constraints set by the room, and whether VIPs are actually available when planned.
Most sessions follow a predictable arc: pre-event planning, day-of coverage, then post-production and delivery. When that arc is respected, you get a gallery that feels intentional instead of random.
Key success factors are simple but non-negotiable: communication, access to the right areas, workable lighting conditions, and clear priorities for must-have shots. If any of those are missing, even great gear can’t “fix it later.”
If you’re building marketing value from your images, it helps to understand why event coverage matters beyond documentation. This breakdown on why strong event photos support a successful event explains the ripple effect across PR, sponsors, and internal comms.
Who This Guide Is For
This guide is for event planners, marketing teams, corporate comms, nonprofits, and hosts hiring a photographer for a professional event photography session. It’s also helpful for photographers who want a consistent workflow and a smoother client experience.
If you’ve ever said “we just need coverage,” then felt unsure how to direct it, you’re in the right place. A professional event photography session is a strategy, not a checkbox.
What You’ll Receive at the End
At the end of a professional event photography session, you should receive an edited image gallery aligned to your brand and usage goals. The best galleries include storytelling coverage, clean branding photos, and enough variety to support multiple channels.
Deliverables should be stated plainly: file formats, image resolution, licensing terms, and delivery timeline. Most teams also want web-ready exports plus print-ready files for press, sponsors, or an annual report.
Before the Event: Planning, Logistics, and Prep
The pre-session consultation is where you prevent 80% of problems during a professional event photography session. A good photographer asks about goals, audience, the event agenda, and the moments that cannot be missed.
Logistics matter more than people expect: venue rules, access, parking, credentials, and a point of contact (POC) who can make decisions quickly. If the photographer is stuck outside a ballroom during the keynote, no amount of editing will recover that during a professional event photography session.
Paperwork should be settled early: contract, invoice and deposit, model releases where needed, and usage rights. This is also where you clarify commercial use vs editorial use, and whether sponsor logos are part of the requirement for the professional event photography session.
Define Goals and Use Cases (Marketing, PR, Internal, Sponsors)
Start by listing where the photos will live: website, press kit, social media, email, internal recap, sponsor decks, or an annual report. Each channel implies different framing, cropping space, and pacing.
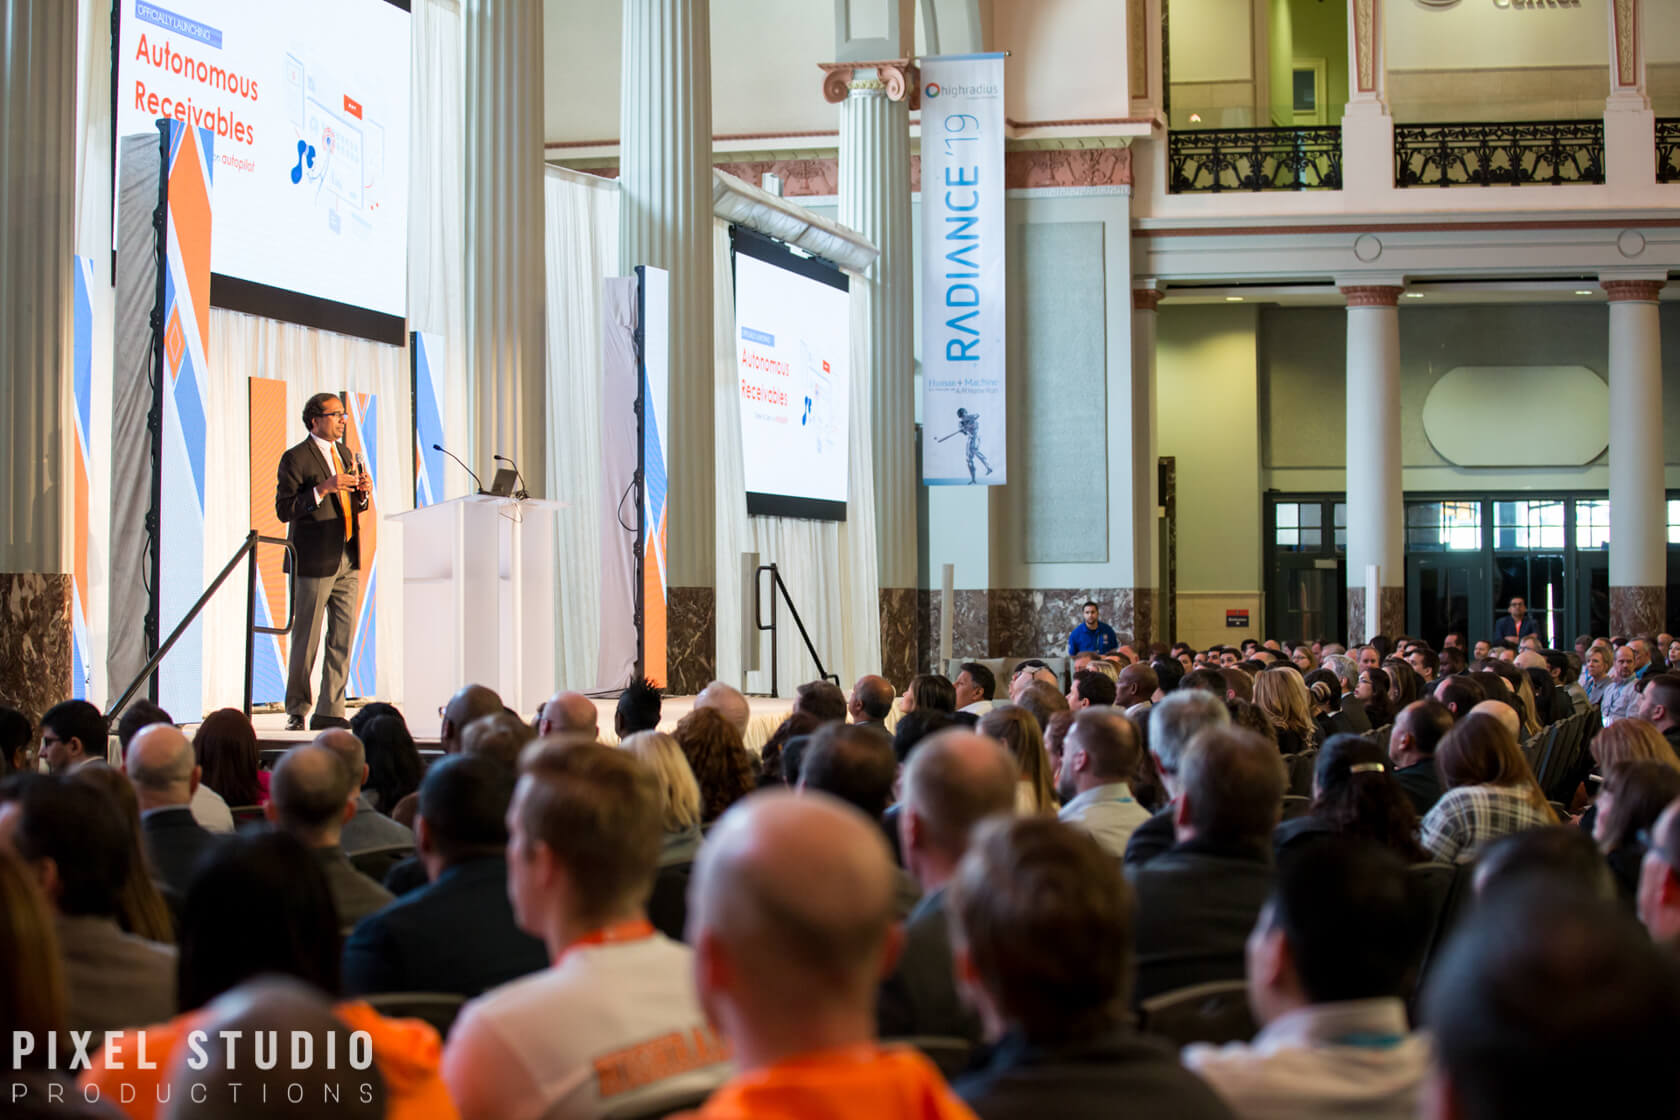
Then translate those goals into coverage priorities. If PR is the priority, you need speaker photos with clean backgrounds, clear branding, and recognizable faces.
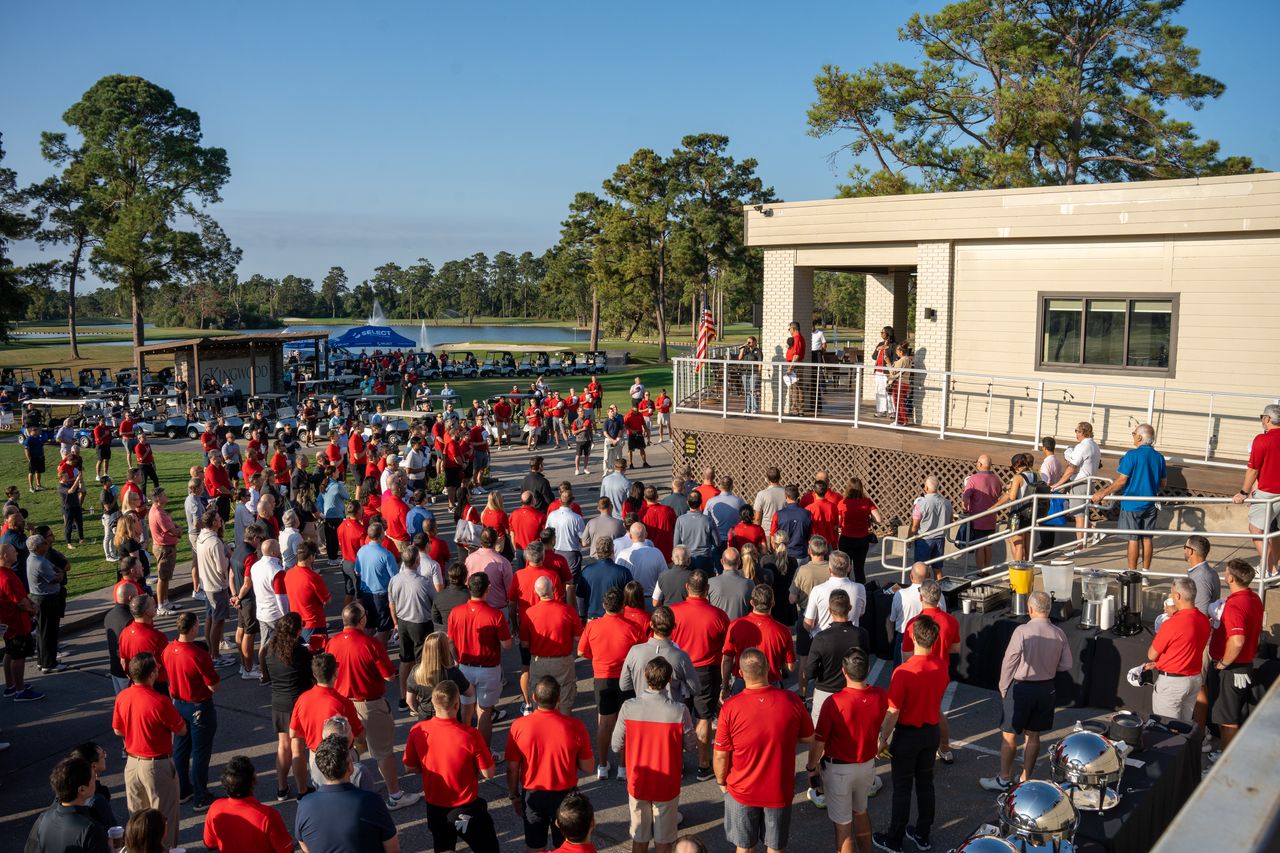
If sponsors matter, you need readable sponsor logos, step-and-repeat shots, and wide establishing shots that prove attendance. If culture and recruitment matter, you need candid moments, audience reactions, and portraits that feel natural.
If your team also needs individual portraits for leadership or staff, it’s smart to align expectations ahead of time. This guide on what a polished headshot session typically includes can help you decide whether to add a quick portrait block on-site.
Build a Strategic Shot List (Without Over-Scripting)
A shot list should protect must-have shots without turning the day into a checklist panic. Think of it as guardrails, not a script.
Must-haves often include arrivals, VIPs, keynote, networking, awards, group photos, and sponsor signage. Add any sensitive moments too, like donor conversations or backstage prep that should stay private.
Nice-to-haves are where the story gets richer: venue details, food and beverage photos, behind-the-scenes, and wide establishing shots that show scale. These are the images marketing teams end up using for months because they’re versatile.
Gear, Backup, and Contingency Planning
A professional event photographer plans for failure, because events don’t pause for gear issues during a professional event photography session. Expect redundancy like dual card slots, a backup camera body, extra lenses, batteries, and a flash that can handle low light without nuking the room.
Mixed lighting is the norm at events, not the exception in a professional event photography session. Uplights, tungsten chandeliers, daylight from windows, and LED panels can all exist in one frame, so planning white balance strategy matters.
Weather and power are part of the plan too. Confirm whether there are outlets near the stage, where gear can be stored safely, and whether the venue has restrictions on light stands or flash use before the professional event photography session begins.
Venue and Schedule Coordination
A venue walkthrough is ideal, but a floor plan review can be enough if time is tight. The goal is to identify stage sightlines, background clutter, and any venue restrictions like “no photography in the hallway” or “no flash during speakers.”
Next, map a photo timeline to the run-of-show. If awards happen immediately after the keynote, you need a position that covers both without sprinting through guests.
This is also where you decide where group photos will happen. Picking a consistent spot with decent light saves real time later.
During the Event: On-Site Workflow and Best Practices
Arrival and setup usually includes check-in, confirming the run-of-show, testing exposures, and scouting lighting. A few minutes here prevents a full hour of fixing problems later.
Coverage should look like storytelling, not surveillance. That means a mix of wide, medium, and tight frames that show context, emotion, and details.
Etiquette matters because photographers work inside other people’s jobs. Expect professional attire that matches the dress code, unobtrusive movement, and respectful coordination with venue staff, AV, and security.
Check-In, Reconfirm Priorities, and Establish Communication
The first on-site conversation should be with the POC. Confirm the VIP list, any no-photo zones, and any moments that are sensitive or legally restricted.
Agree on real-time requests. Some teams prefer a quick text, others want a short in-person check-in during a break, and some venues use radio comms.
If “we need sponsor coverage” is mentioned, clarify what that means in practice. Is it logos in the background, posed sponsor reps, or a clean shot of a step-and-repeat?
Capturing Key Moments and Details
Stage coverage is more than “speaker centered.” Strong speaker photos include a clean angle, flattering light, and context like audience reactions or the screen when it adds meaning.
Details matter because they prove production value. Capture signage, step-and-repeat, sponsor logos, name badges, and décor in a way that’s readable and not distorted.
Don’t forget the in-between moments. Candid moments of people listening, laughing, and greeting each other are often the most useful images for post-event marketing.
Managing Lighting and Audio-Visual Constraints
Mixed lighting is where experience shows during a professional event photography session. A photographer may choose a consistent white balance for the room, then adjust locally in post-production, or they may set a custom white balance for key areas like the stage.
Screens and projectors create their own problems during a professional event photography session. To protect faces, exposure is usually set for skin tones, then the screen is allowed to go slightly bright or slightly dark depending on the look.
LED walls can cause banding on camera. A pro will adjust shutter settings, angles, and timing to reduce it, rather than hoping retouching will solve it after the professional event photography session.
Group Photos and Portrait Moments (Fast and Friendly)
Group photos succeed when someone besides the photographer helps gather people. Assign a wrangler who knows faces and can pull VIPs quickly.
Posing should be simple: height order, hands out of pockets (or everyone in pockets), shoulders angled, and a quick background check for exit signs or half-visible logos. The photographer should shoot multiple frames to avoid blinks and weird expressions.
Keep the flow consistent by using the same spot and the same lighting setup. When groups rotate fast, your results look more uniform and your timeline stays intact.
After the Event: Culling, Editing, Delivery, and Archiving
Post-event workflow should be predictable: backup, cull, edit, export, and deliver. If your photographer can’t explain their backup workflow, that’s a risk you don’t need.
Editing scope should be defined upfront. Most professional delivery includes color correction, exposure balancing, cropping, and light retouching like minor blemish cleanup on close portraits, not magazine-level face reshaping.
Delivery should include clear details: online gallery access, file naming, usage rights, and how long the images will be archived. Turnaround time should be written into the agreement, especially if you have press deadlines.
Backup and File Safety (Immediately After Coverage)
Cards should not be formatted until files exist in at least three places, following the 3-2-1 backup rule. That means 3 copies, on 2 types of media, with 1 off-site or cloud copy.
A clean folder structure prevents confusion later. Organize by date, client, and event name so a future request like “find the sponsor wall shots” takes minutes, not hours.
Culling and Editing: What “Professional” Typically Includes
Culling removes blinks, duplicates, unflattering expressions, and technical misses. It’s also where the story is shaped so the gallery feels intentional.
If you want a deeper explanation of how photographers choose selects, this piece on how culling works and why it matters breaks down the decision process.
Editing typically includes consistent color grading aligned to brand style. Mixed lighting can be corrected to a point, but the cleaner the light on-site, the better the final result.
Delivery, Licensing, and Turnaround Times
Confirm deliverables in writing after a professional event photography session: estimated number of images, image resolution, and whether you’ll receive both web and print exports. Ask for file formats too, usually JPG for delivery and sometimes TIFF on request for print-heavy workflows.
Licensing should be explicit and aligned with copyright and usage rights. Commercial use generally covers marketing and promotional use, while editorial use is tied to news and documentary contexts, and exclusivity changes pricing.
Also clarify credit requirements and whether images can be shared by the photographer. If model release language is needed for certain uses related to the professional event photography session, handle it before the event, not after.
Post-Delivery Support
Good photographers help you use the work well. That can include a short “best use” note covering cropping for social, alt text suggestions, and brand-safe selections for executives.
If you need rush edits for a press release, that should be agreed in advance. Same-day delivery is possible in some cases, but it requires a plan, a time window, and a realistic edit scope.
For teams that also manage personal sessions, some planning habits carry over well. These prep tips for portrait sessions translate surprisingly well to group photos and quick on-site portraits.
Example Workflow: Corporate Panel + Networking Reception
A corporate panel plus reception is a classic split-coverage event within a professional event photography session. The plan usually prioritizes speaker photos, audience reactions, branding photos with sponsor logos, then candid networking.
Timing is where most surprises happen. Panels start late, Q&A runs long, and the reception begins while people are still asking questions, so you need a coverage plan that survives schedule drift during a professional event photography session.
A balanced deliverable set might include: 10 to 15 establishing shots and details, 25 to 40 stage and audience images, 30 to 60 networking candids, and a handful of posed portraits or group photos for leadership and sponsors. If the event changes last-minute, you protect must-have shots first, then fill in the story.
If your goal is stronger marketing performance from the gallery, this article on using event images to strengthen your online presence lays out how to pick and deploy images across channels.
Sample Shot List (Lean, High-Impact)
- Establishing: venue exterior/interior, signage, registration table
- Program: panel wide, individual speakers, audience reactions, Q&A, sponsor mentions
- Networking: candid conversations, posed pairs, group clusters, VIP interactions
Sample Timeline (Day-Of)
- T-60: arrive, scout, test lighting
- T-15: arrivals
- Program: stage coverage
- Post: networking and portraits
- End: quick check with POC to confirm nothing was missed
Common Mistakes to Avoid (Client and Photographer)
Vague goals and no shot priorities lead to missed must-have moments. “Just get a lot” usually produces a gallery with gaps where it matters.
Lighting and access constraints are the quiet killers. If the venue restrictions block flash, or the photographer can’t cross the room during the keynote, you need a different plan before the event starts.
Unclear deliverables create frustration on both sides. Define editing level, turnaround time, and licensing so nobody is surprised after the invoice is paid.
Mistakes Clients Make
Not assigning a POC or wrangler for group photos is a common one. Another is failing to share the VIP list, then expecting the photographer to recognize donors and executives on sight.
Teams also underestimate how long “heavy retouching” takes. If you need magazine-level retouching or same-day delivery, budget and schedule for it upfront.
Mistakes Photographers Make
No redundancy is a professional risk. A backup camera body, extra memory cards, and enough batteries should be standard, not optional.
Another miss is not confirming run-of-show changes. If the awards move earlier and nobody tells the photographer, sponsor requirements and branding photos can get skipped.
Quick Takeaways Checklist
- Before: goals, shot list, logistics, contract
- During: coverage + etiquette
- After: backup, edit, deliver
One owner for communication, one source of truth for priorities. That alone prevents most day-of chaos.
FAQ
Do you do pictures before or after a ceremony?
Often both. Pre-ceremony is ideal for prepared portraits, details, and calm group photos, while post-ceremony is where you capture candid reactions and real energy, depending on the timeline and lighting.
How do you do before and after photos?
Use consistent framing and lighting where possible. Start with a clear “before” establishing shot, then repeat the angle after the change, keeping exposure and white balance as consistent as the space allows.
What are the 5 steps of the photographic process?
Plan, capture, ingest and backup, cull and edit, then deliver and archive. Each step protects quality and supports a reliable turnaround time.
What to do before professional pictures?
Share your goals and a strategic shot list, confirm schedule and locations, and align on dress code and professional attire expectations. Also confirm deliverables like turnaround time, usage rights, licensing, and whether a model release is needed for your intended commercial use.